Running The Game
This document is written for a fresh GM, but veteran GMs may still find useful ideas. Most of these ideas are not original, rather they have been consolidated from dozens of books and hundreds of blogs.
Getting a Group Together
I highly recommend trying to play in-person. The easy way to do this is to ask friends to play. If that’s not an option, or to fill in extra seats at the table, the looking for group subreddit works. I can personally vouch for it. There are other services like startplaying.games.
Finally, it’s worth advertising at your friendly local game store. They often let people reserve tables or have a dedicated night. If you google “friendly local game store near me”, you’ll hopefully get some nearby places. If you don’t, experiment with… moving to a city. Once you find one, call them and ask about D&D, that’s usually way faster than trying to navigate bespoke (and frequently out of date) websites.
Playing Consistently
Get people together, noncommittally to see if they like playing in your game. Make sure they’re safe, and that you’d be comfortable having them in your house. I like to have lunch with people at a restaurant before inviting them to my home (sort of like how dating works), but meeting at a game store in the beginning works too.
Once you have a group together, fully commit to a schedule. There’s a line from ACKs 2e that I like a lot:
If you’re planning to start a successful campaign, you need to explain to your friends that you are not hosting a series of social events. You are starting an intramural sports team and asking them if they’d like to be on the team.
At social events, it’s okay for people to bail or show up late. In team sports, it’s not okay. They’re letting the team down. This is a commitment. If that scares them off, that’s fine! Find someone who really wants to play. Lots of people pay for a game master, no one pays for players. Plenty of people really do want to be there; find those people. Setting this expectation properly will save more grief than anything else.
Even so, stuff will come up. Birthday parties, holidays, travel, etc. Make it clear ahead of time that you’ll play so long as half of the players can make it. Decide up front what to do with the characters of the players who aren’t there. Some folks are unattached, and don’t mind if someone else pilots their character. Some people love their character, or no one feels comfortable accepting that responsibility. In these cases, I handwave those characters away. Trying to narratively explain how these characters pop in and out isn’t worth it. Just tell the players this. For example:
GM: You check the door - it’s locked. What do you do?
Alice: Dang - Bob’s (who is on vacation) character Bogdan is the one with all the Sneak. Can his character pick the lock?
GM: No - though I think Bob should be around for next session. Bogdan just isn’t here and I’m not going to try to figure out how to explain the dissapearance or his smooth reappearance next week, I’ve tried before and it’s always too weird.
Alice: Hah - fine, so maybe we… bash the door in?
Handling Interpersonal Problems
Just talk to them. Seriously. Don’t post about it on social media and ask for advice. Don’t do mean stuff to their characters as retribution. Tell them how your behavior is impacting you, and suggest other ways for them to behave instead. Listen to them. Not everyone is a good fit for every table. It’s totally fine to let folks know that they aren’t a good fit for the table. It doesn’t need to be dramatic and shouldn’t be (sort of like dating).
Necessary Materials
- Pens. I personally use a Pilot Prera.
- Pencils.
- Paper.
- Dice. I highly recommend folks use a different color for each size of dice as they’re learning.
- Card Stock. For item and spell handouts.
- Scissors. For cutting out character sheets, items and spell handouts.
- A Battlemap. This one is dry-erase compatible, which is great. For travel, I like silicone maps.
- Dry Erase Markers. If you have a wet erase battlemap, get wet erase markers instead.
- Meeples. Label each color 1 through 10 with a Sharpie and use them for monsters.
- Character Tokens: Magnets + Epoxy Stickers + Hole Punch. From JP Coovert’s Youtube.
- Printer. Good for printing modules, character sheets, maps, handouts, etc.
- Awl. Sewn digest modules lay much more nicely than stapled ones.
- Needle and Thread. For binding modules.
- 3 Ring Binder. Some modules are natively printed on big paper (like Castle Xyntillan) and printing them out digest style makes the font painfully small. For these, we use a hole punch and a 3 ring binder. Additionally, GM notes go in a separate 3-ring binder.
- 3 Hole Punch.
The specific product recommendations are all optional. At a higher level, you need some way to:
- Record character information (pencil and paper)
- Generate random numbers (dice)
- Take GM notes (pen, paper, 3-ring binder)
- Read adventures (printer and paper)
- Prepare adventures (pen, printed adventure)
- Represent a battle (battle map, markers, meeples, character tokens)
As long as you have these things handled, you’re good.
Preparing an Adventure
Read the module cover to cover. Then, start back at the beginning and try to mentally answer each one of these questions:
- How does the game start?
- Does each faction have a goal?
- For each room:
- Is it clear what I should say when the players enter the room?
- Does each trap and secret door have a mechanism and tell?
- Does it have all of the information necessary to run it?
- Are stat blocks accurate and complete?
- Does the key match the map?
- Is the amount of treasure appropriate for the risk?
- Can I replace random values with pre-rolled results?
For an involved demonstration of this process, check out my Audit of Tower Silveraxe.
How Does the Game Start?
Some dungeons, like Borshak’s Lair, just detail a dungeon. Here, you’re using hard framing to narrate how they found out about the dungeon, what information they gathered, their trip to the dungeon, and what it looks from the outside.
For instance
At Slarkeron the Wizard’s behest, you venture past the Valley of Barzak Bragoth, around Lake Shimron, and just north of Tol Bandur to the ancient tomb of Lord Helmdar.
Slarkeron says that a rival named Tim the Moonslayer claimed the tomb and created a tunnel complex for his crazed experiments but hasn’t been heard from in decades.
You arrive at a stairway leading deep under the earth. The walls are moist but not slimy; the air is cool, damp, and silent. What do you do?
Other adventures, like The Evils of Illmire detail a town and multiple nearby dungeons. It is usually safe to start the players in the town, let them gather information about the adventure, and choose where to go. If the town is weakly detailed, nothing interesting to do in town, or there’s no real choice about where to go, we skip forward to the dungeon entrance, letting the town fade into the background as a place for the adventures to return to to resupply or recover System Strain.
If this is the first session, strongly consider starting them at the entrance to a dungeon rather than in a town.
Factions
I love GFC’s take on factions. The summary is that you should be able to write
[FACTION] wants [MOTIVATION], but [OBSTACLE]; therefore, [METHOD OF SURMOUNTING OBSTACLE]
for each faction. If the faction doesn’t want anything, it’s hard to know how to get them to act or how they’ll react. If nothing is stopping them from getting what they want, why don’t they have it? If they’re not trying to remove their obstacle, what are they doing, and do they actually want the thing?
Read through the factions in the adventure (and dungeon), and make sure they’re at least this complex. If they aren’t, flesh them out! The Parley information has some sample motivations (from The Monsters Know What They’re Doing) for each kind of creature:
Dragons want food, territory, treasure, and domination.
Humanoids want territory, treasure, domination, or higher order concepts like fairness, kindness, loyalty, obediency, and sanctity.
Giants are obsessed in their place in the hierarchy of Giants, and anything that will help them climb that hierarchy.
Undead and constructs are compelled by whatever directive created them.
Fiends want to cause suffering.
Aberrations have intentionally alien, unintelligible motives.
Fey have emotional motives, often following dream logic or the seven deadly sins (gluttony, lust, greed, sorrow, wrath, sloth, pride).
It’s helpful if the motivations, obstacles, and methods of different factions overlap somehow. Have two factions want the same thing, or two different factions are blocked by the same obstacle.
A neat way of visualizing this is given by Murkdice.

Room By Room
Initial Description
The easiest is when adventures provide well written read-aloud text. For instance, here’s Temple of 1000 Swords:
You just read it! As you’re reading through each room, check to make sure that it avoids the classic pitfalls:
- Do not describe reactable action while assuming the players are doing nothing.
- Do not declare the actions or thoughts of the PCs.
Or in other words, focus on the scene - what the Characters see, hear, and smell. When you describe something that they might want to react to, stop then and ask “what do you do?”
The second easiest is when there’s formatted text. Here’s The Black Wyrm of Brandonsford:
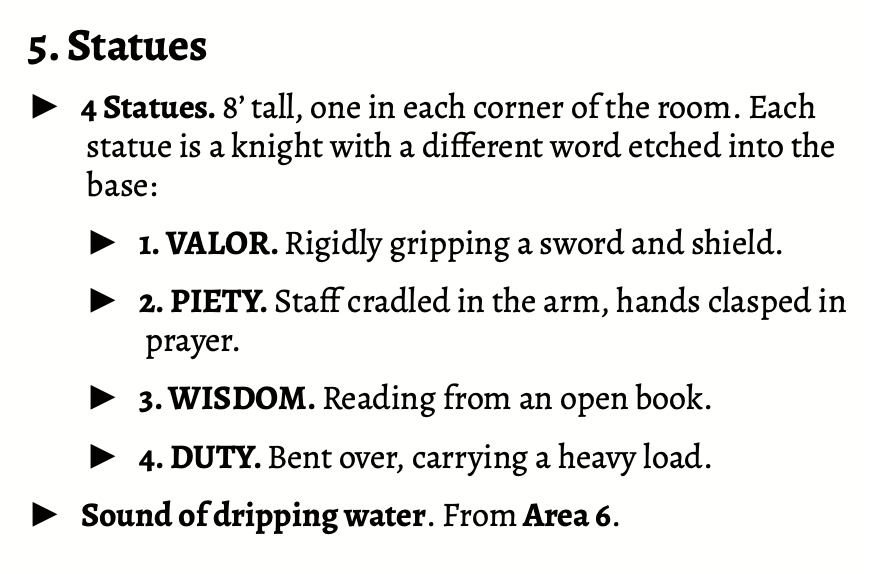
This is still easy enough to run it at the table with no modification.
You see four statues, 8’ tall, one in each corner of the room. There appears to be something etched into each statue’s base, but you’re not close enough read them. You hear the sound of dripping water from the northwest. What do you do?
When cobbling this sort of reading together, we want to make sure we assume no action. Here’s a video of a guy exploring a cave by torchlight. Torchlight is not enough to be able to read text from a distance; they need to get right up next to it. We don’t assume that players move drapes to see what’s behind them, or open containers to see what’s in them. We save those details for the Core Gameplay Loop.
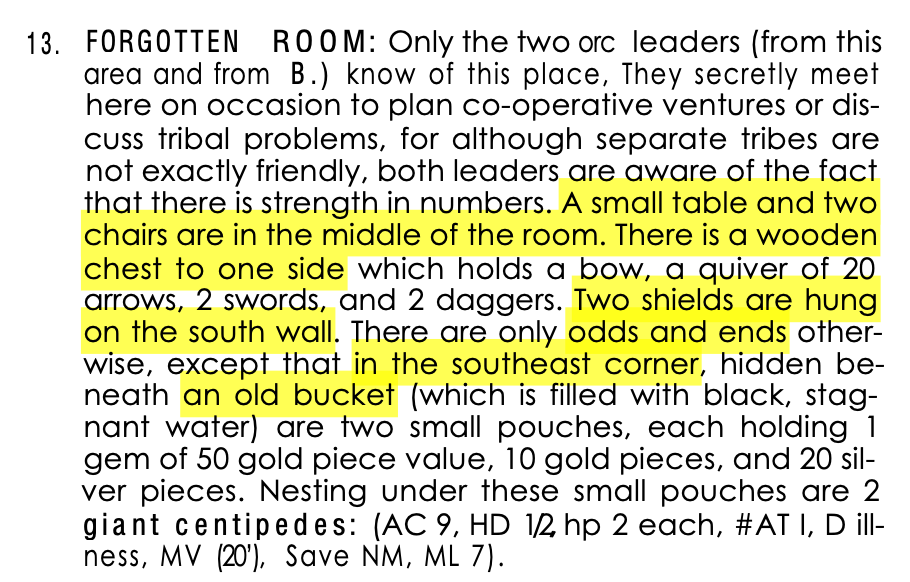
The hardest is dense text; the denser and longer the more work we need to do. Many of the 80s TSR modules used descriptions like this. Here’s Keep on the Borderlands
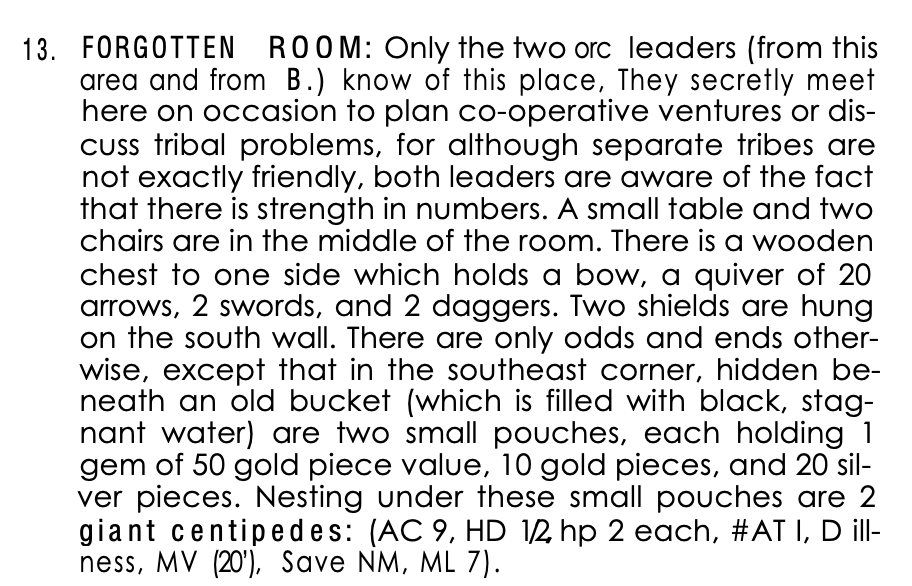
Note how the description of the room is buried in the text. After we print out the module, we grab a highlighter and highlight the bits we need for the initial description.
 .
.
Now, it’s much easier to cobble together or initial reading:
You see a small table and two chairs in the middle of the room. There’s a wooden chest pushed up against the east wall, and two shields are hung on the south wall. Among other odds and ends, is an old bucket, resting on something; clearly elevated. What do you do?
Finally, as we’re going through each room, we want to mark out irrelevant text. Filler words, mundane descriptions of exits (implied by the map), and objects that would obviously be in a room (like describing there are pots and pans in a kitchen).
For instance, here’s Tower Silveraxe:
14)
There are 2 doors here; northwest and southeast. The room is otherwise empty.
or
5)
This hall is long and has a few exits and turns. See map.
or
4)
A large room with 4 doors anda round 10’ pool in the middle. The pool is purely decorative.
Traps
There are two good sources on this, both of which say the same thing: A Treatise on Traps - GFC and Stop Hiding Traps - Ben Milton.
GFC’s is more procedural and I love a good procedure. Each trap needs to have a mechanism (causes the trap to spring and informs how it can be disabled), a consequence (what happens if the trap is sprung), and a tell (how the Characters could tell it’s there).
Unfortunately, most modules only describe the consequence. During our room-by-room pass, we’ll make sure that each trap has all three components.
For example, from Stonehell:
(22) Gas Fountain: Dry stone fountain adorned with a statue of a leaping fish. Fish spouts poison gas (2 in 6 chance; save vs. poison or die) in 10‘×10‘ cloud if the fountain is disturbed.
There’s sort of a mechanism (disturbing the fountain), no tell, but definitely a consequence (death).
It’s hard to imagine how the statue could be rigged up with a purely mechanical sensor delicate enough that any disturbance causes it to release poison gas. Especially one complex enough that it can be re-armed (if it can’t be re-armed, then it should have been triggered long ago).
The easiest thing here is to make it magical, and then attach a few ethereal hooks that Sense Magic or See Magic would pick up on.
For the tell, we can say that the fish’s mouth has a finger-sized hole in it that runs deep into the statue (where the gas comes out).
Putting it all together, The statue has several ethereal hooks running from it to the ground. Pushing or turning the statue might (2-in-6 chance) tug on one of the hooks, and trigger a magic item inside the statue capable of producing poison gas. The gas travels from the interior out the fish’s mouth.
Unless an adventure specifically mentions otherwise, traps only have a 2-in-6 chance to trigger even if their trigger explicitly happens. You can walk over pit traps 4/6ths of the time; you miss tripwires 4/6th of the time, etc. Roll for each triggering action. For instance, if a party of 7 Characters walks over a tripwire, roll 7 times.
Full Information
Make sure that all of the things that affect the room are explained in the room. There are three main things to look for:
- Switches/levers/etc that exist in other rooms that affect this room.
- “Keys” from other rooms for “locks” in this room.
For an example of the first, here’s Hole in the Oak:
(29) Plinth and Chalice
Stone plinth (4’ high). Bathed in golden light (a 10’ diameter pool of light surrounds the plinth). Platinum and sapphire chalice (upon the plinth, worth 2,000gp, full of water).
Stepping into the light: 2d6 evil tree babies leap from the trees and attack.
which is related to:
(24) Control Room … Pulling lever 4: Deactivates the golden light in Area 29.
Whether or not there’s a golden light is affected by whether or not a lever has been pulled in a different room. Room 29 needs to let us know that this is the case (otherwise we’re likely to forget).
Keys and locks are in quotes because they’re not only literal, mundane locks and keys, but also any abstract lock and key in the game design sense. For example, from The Necropolis of Nuromen:
(9) Neuromen’s Apartments … The girl’s bony wrist bears a silver bracelet which has her name, “Anthea”, engraved upon it. The girl’s name is the password to the magician’s study (12).
When we read this, we skip forward to (12) and make sure that it tells us the password is “Anthea” and this can be found in (9). Nuromen partially succeeds at this:
(12) Nuromen’s Study … When anyone approaches the copper-plated door to this hall, a corpse face moulded into its surface will animate and state, “NONE MAY PASS UNLESS THEY KNOW THE WORD.” The password is Anthea, the name of Nuromen’s daughter. If this is offered, the face will moan, “You may pass.” as the door swings open.
Better is to also mention where this information can be discovered:
(12) Nuromen’s Study … When anyone approaches the copper-plated door to this hall, a corpse face moulded into its surface will animate and state, “NONE MAY PASS UNLESS THEY KNOW THE WORD.” The password is Anthea, the name of Nuromen’s daughter (Found in (9)). If this is offered, the face will moan, “You may pass.” as the door swings open.
Finally, differentiate mundane keys. If you tell the Players that they found a key, they’ll just write down “key”. You might know that it’s for the door to area 25, but they don’t. Then they find 4 more keys. Eventually when they get to area 25 and ask if any of the keys fit, you’ll have to be like “do ya’ll have the uh, key from… area 9?”
This is circumvented by making each key unique. “Small brass key”, “Big iron key”, “twisted key” etc. Make sure you update both room you find the key in and the room the key unlocks. “Unlocked by the key from area 9” becomes “Unlocked by the twisted key (9)”.
Monsters
When possible, use the monster statistics from Osric. I provide a searchable index, as the author chose an interesting categorization scheme.
Most Adventures use the following monster statistics:
- Hit Dice (HD): A shorthand for a monster’s HP formula. Monsters have
HDd8 + 4•HDhp. Sometimes the hit dice will be listed like6+3*(the Troll from OSE does this). This means that we add (or subtract) the given amount of HP at the end. If there are asterisks at the end, that’s shorthand for the number of special abilities the monster has, to determine XP. Any amount of bonus HP gives +1 to attack rolls and counts as a special ability for calculating XP. - Armor Class (AC): Some games use descending AC (lower is better), some games use ascending AC (higher is better), some games (like OSE) provide both, denoting the ascending AC in [brackets], like
AC: 4 [15]. Convert descending AC to Sovereign by subtracting from 20, so AC 6 converts to AC 14. Ascending AC can be used as-is. - Attacks (ATT): The number of attacks the creature makes in a round. Some games include damage information in this line, others split it up. For instance, OSE writes “2 × talon (1d6), 1 × bite (1d10)”. This means “Two talon attacks that each do 1d6 damage, then a bite for 1d10 damage”. Osric writes “Attacks: 2. Damage: 1d6/1d10”. This means the creature makes two attacks, the first for 1d6 damage and the second for 1d10. Finally, some creatures have options for attacks, like the White Ape. “2 × claw (1d4) or 1 × thrown rock (1d6)” means it can either make two claw attacks for 1d4 damage or it can throw a rock for 1d6 damage, but not both.
- Damage (DG): Predators have the warrior’s Killing Blow ability - increase the listed damage by half of it’s HD rounded up.
- Shock (Sh): The Shock damage a monster does with an attack. D&D games won’t have this attribute, so use shock for their Weapon. Natural weapons affect AC 13 if they are piercing (like teeth), AC 15 if they’re slashing (like claws), and AC 18 if they’re bludgeoning (like headbutts). Bump these up 1 category if the creature is large (at least as big as a horse). For example, a polar bear’s bite would affect AC 15, their claws would affect AC 18, and shoulder tackle would affect any AC. Add half of a predator’s HD to any shock damage from weapons, and use this value for shock damage for natural weapons.
- THAC0: An abbreviation for “To Hit Armor Class 0”. We can subtract this number from 20 to derive the monster’s attack bonus. If no THAC0 (or “attack bonus” or “+hit” or similar) is given, use the monster’s HD.
- Movement (MV): Often listed as two numbers with the second number in parenthesis as 1/3rd of the first number, like “120ft (40ft)”. This refers to the monsters exploration speed, and then their combat speed in parenthesis. If a single number is given, it almost always refers to to the exploration speed, so to use it in Sovereign, divide by 3. If the number is given in inches, multiply by 10 and then divide by 3. For example, 12” converts to 40ft.
- Weapons: If a monster’s damage lists “by weapon”, give them a Weapon, and then use the weapon’s base damage. Try to give each creature a ranged weapon (at least a sling or a bag of rocks), and then a mix of swords, axes, maces and spears. Either roll randomly or use verisimiltude - if the main foe of kobolds is unarmored troggs (15 AC), the kobolds don’t need the armor penetrating properties of maces, and would favor short swords (since they would do shock damage).
- Saving Throws (SV): Discard these. Monsters have a flat saving throw of 15 minus half of thir HD, rounded down. For example, a 5 HD Bear has a saving throw of 13+.
- Magic Resistance (MR): An additional layer of magic defense, applied before (and in addition to) saving throws. AD&D 1e expresses this as the percentage that the monster would resist a spell cast by an 11th level magic user. For each level below 11, increase the probabilty by 5%. For example, a Spectral Troll with 30% MR has a 60% chance to resist a spell cast by a 5th level high mage:
(30 + (11 - 5)*5) = 60. If the monster success their magic resistance roll, the spell does not effect them. It’s not the way I would have done it, but it’s what we have! - Morale (ML): Discard morale; the GM chooses when monsters flee according to the principles in Morale.
- Alignment: Discard this; the GM chooses how monsters behave according to the principles in Factions.
- XP: Discard this, using the XP values from XP For Monsters.
Special abilities should all translate normally, using discretion where required. For instance, a Troll has “Fear of Fire: Morale 8 when attacked with fire or acid”. I’d have a Troll flee when reduced to 2/3rds or more HP by fire or acid, but never otherwise (since they can regenerate, and so do not fear mundane death).
In general, the monsters know what they’re doing. Use their stat blocks to the best of their abilities and fight dirty; the better you demonstrate system mastery, the more tricks your players can learn from you and the more interesting the fights will be.
Inline Monster Stats
Do not trust in-line monster stats. Adventures, for some forsaken reason, assume you’re familiar with the bestiary and don’t bother to include important stats (like movement speed) or special abilties. For instance, check out this description of a Troll from Tower Silveraxe
troll(AC4[15],HD6+3*(30hp), Att 2 x talon(1d6), 1 x bite(1d10), THAC0 13[+6], ML 10(8 fear of fire))
Compare this to the stat block from OSE (which Silveraxe is built for):
Troll
Intelligent, wicked, 8’ tall humanoids with emaciated, rubbery bodies. Consume the flesh of other humanoids. Dwell underground, in barren wilderness, and in the ruined homes of former victims.
AC 4[15] HD 6+3* (30hp), Att 2 × talon (1d6), 1 × bite (1d10), THAC0 13[+6], MV 120’(40’), SV F6, ML 10 (8 *fear of fire), AL Chaotic, XP 650
- Regeneration: 3 rounds after being damaged, start regaining 3hp per round. Severed limbs reattach.
- Return from death: If killed (0hp), will regenerate and fight again in 2d6 rounds.
- Fire and acid: Cannot regenerate damage from these sources. The only way to permanently kill a troll.
- Fear of fire: Morale 8 when attacked with fire or acid.
The Silveraxe statline leaves out the bit about acid, and their entire regeneration ability. My experience is that this happens over and over.
Throw out the inline stats and look up the monster from Osric. Here’s an index. Osric monsters tend to be a little more powerful than OSE monsters and Sovereign characters are more powerful than OSE characters of the same level.
Example
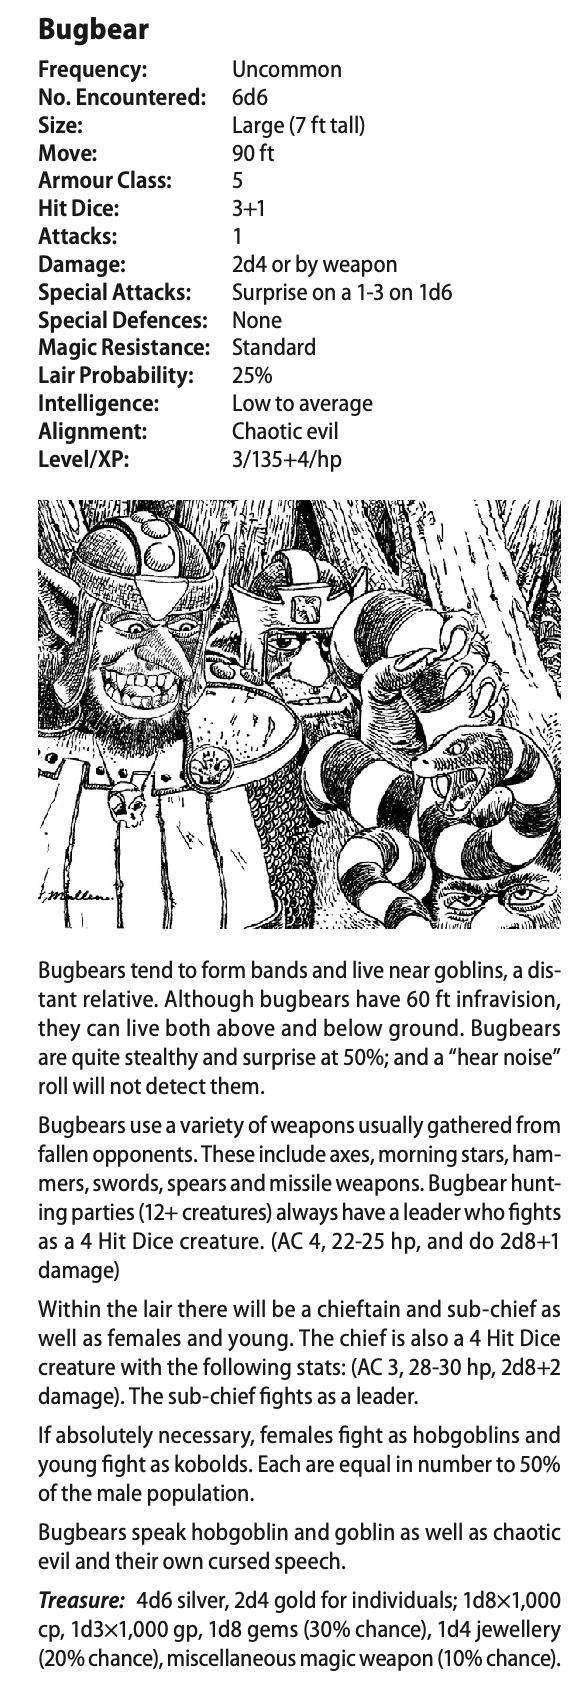
Each bugbear has 3d8+1 HP, and can use weapons (so they should be equipped with short bows and swords/spears/maces/axes). They’ll roll +4 to hit for weapon damage plus 2 (from half their HD rounded up), so a Bugbear equipped with a shortsword does 1d6+2 damage, or 4 shock damage to up to AC 15 on a miss. The infravision translates directly (able to see heat differentials). I’d translate their surprise ability as a penchant for setting ambushes. Each Bugbear is worth 50 XP.
Double-Check The Map
While we’re looking at the room, check to see where it is on the map. Make sure it’s on there (it’s shocking how often it isn’t). Make sure that it’s properly labeled (sometimes two labels have been switched).
If there are open passages leading to other rooms, make sure that any information that players could glean from those rooms is mentioned in this room.
For instance, if room 9 is connected by an open 10-ft strech of hallway to room 22, and room 22 is a dining hall where bandits are singing drunken songs, room 9 should mention this.
Re-Balance Treasure
We want to make sure that there’s between 3-4x more gold worth of treasure in a dungeon than XP of the denizens defending it. This helps make sure that bewteen 75-80% of the XP players get comes from looting treasure.
We do this because “get treasure” is open ended. Players can steal it, kill for it, negotiate for it, etc. It’s a much more interesting goal than “kill stuff”.
If there’s too much treasure in a dungeon (as is usually the case with adventures), then the risk:reward balance is out of whack.
Unfortunately, there’s no quick way to do this. You have to go through each room and record the treasure and monster XP. Here’s a google sheet to help track it (make a copy of it). The sheet is filled with an example from Incandescent Grottoes.
Incandescent Grottoes has 40481 lootable treasure, 2208 xp worth of keyed defenders, for a ratio of ~18. This is absurd! It’s enough to get a party of 4 Characters from level 1 to nearly level 5, which is way too much. We’re going to want to divide every piece of loot in the dungeon by 5 to get this back in line.
We also want to re-balance magic items so that they represent ~15% of the location’s total treasure value, split roughly 3-to-1 between consumables (scrolls, potions, etc) and permanent magic items.
Incandescent Grottoes has a whopping 23 magic items. We want it to have 4, so we need to cut ~19 of the magic items.
The biggest candidates for removal are healing potions or scrolls of cure light wounds. Scrolls can often become spell books (that the Mages can learn from), trading vertical progression for horizontal progression. Prefer magic items that do something unique (like a potion of gaseous form or a ring of plant control) to something that provides passive numerical combat bonuses (like a +1 sword).
For example, in Incandescent Grottoes, I kept the Ring of Plant Control, Potion of Gaseous Form, Scroll of Blacklight, and Lamp of Fictitious Finery. I removed:
- Scroll of Hold Person
- Scroll of Cure Disease
- Scroll of Wraithform
- 3x Scroll of Cure Light Wounds
- Transformed a Scroll of Charm Ooze into a Spellbook of Charm Ooze
- Transformed a Scroll of Gelatinous Transformation into a Spellbook of Gelatinous Transformation
- Potion of Healing
- Potion of Poison
- Potion of Invisibility
- Ring of Smell Nullification
- Ring of Protection
- Mirror of seeing-the-last-person-you-killed
- 5x Arrows +1
- 5x Sling bullets +1
- Silver Dagger +1
- Shield +2
- Short Sword +2
- Dagger +2
Pre-Rolling
I go in-depth here in On Randomness. The takeaway is that we should be skeptical of GM-side randomness.
Random encounters that have random amounts of enemies (like an entry that says 1d6 goblins) can often be pre-rolled (by replacing it with an entry that says 3 goblins). Commit up-front to how many such total wandering monsters there are of each type; a good rule of thumb is that there are 7x more enemies than the average result (so for 1d6 goblins, there might be 25 wandering goblins total).
Random treasure can always be pre-rolled.
Random encounter lists can usually become ordered encounter lists (we don’t normally want to re-use results). A quick way to do this is with random.org/lists.
For instance, the encounter table from Nuromen:
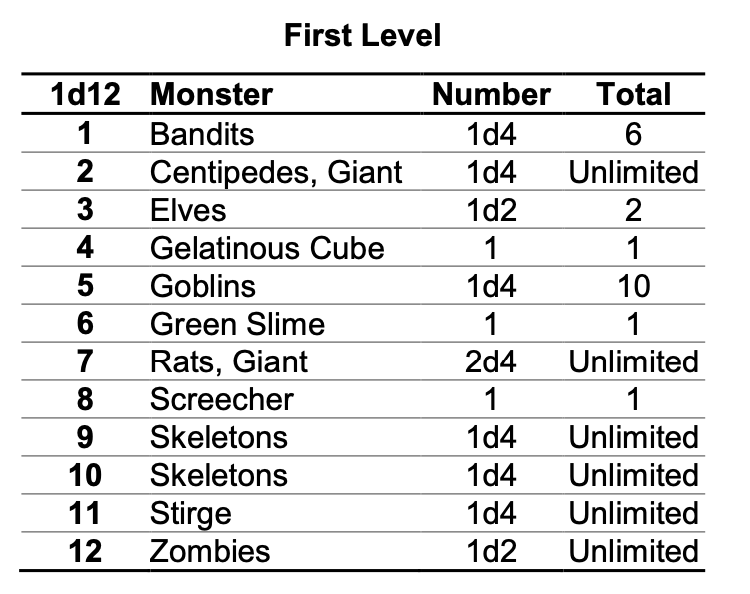
Can become:
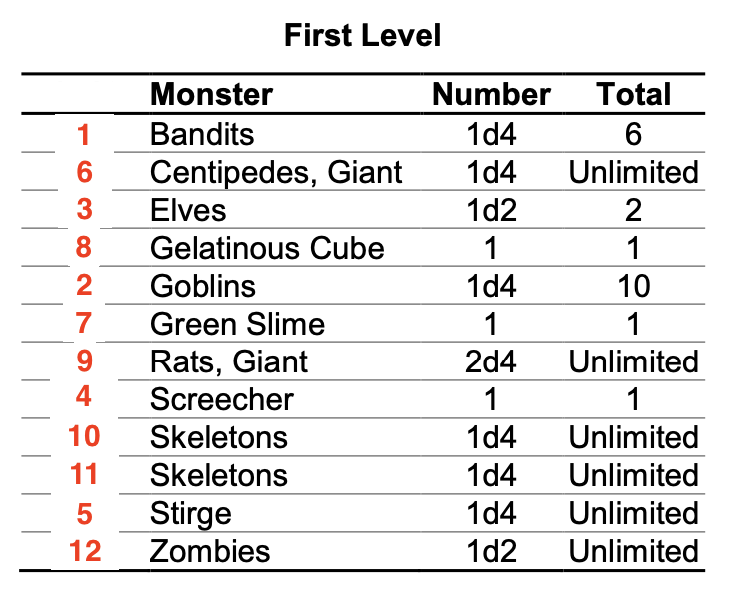
So it’ll be Bandits, then Goblins, then Elves, then Screechers…
During The Session
Almost all of the work is front-loaded in Preparing An Adventure, and your job during the session is to properly execute the Core Gameplay Loop over and over. That said, there are a few GM-specific areas worth diving into.
Specifying Details
From blorb principles: if you’re asked to specify details like “What is in this office?” then:
- Refer to your (edited) adventure.
- Otherwise, maybe you have a heuristic like “desks have quills, paper, and boring ledgers” or you’ve already made a random table of office contents.
- Otherwise, invent something that won’t harm or help the players very much. Feel free to make it evocative but not distracting. After the session, patch the hole. Either create a new heuristic, random table or whatever for the future.
It’s useful to have random tables of all kinds. Set dressing (the stuff that gives a location the proper feel), NPC names, etc. You don’t need to crazy creating these in advance. I source these from scenes in fantasy fiction: Malazan, Fafhrd, Dying Earth, World of Warcraft, Wheel of Time etc.
Looking Up Rules
If you’re unsure, look up the rules when the stakes are high. Make a ruling and look it up after the game when the stakes are low.
It’s fine to mess up something that doesn’t matter a lot; better to keep the game moving. It’s not fine to accidentally kill character because you couldn’t remember how Screen an Ally works.
Most players will not read the rules. You’re going to have to. When a player forgets a rule the first time, remind them how it works. When a player forgets the same rule the second time, ask them to look it up and tell you how it works. When a player forgets the same rule the third time, maybe the rule is hard to remember, and I’d appreciate being notified!
If you forget an important rule a lot, add it to your personal cheat sheet or GM screen (the same place you’re keeping your random tables).
Order of Battle
Wandering Encounters represent the initial activity of a dungeon, before the inhabitants learn that the Party is invading their home and stealing their stuff. After first contact, the inhabitants should respond based on their natures. Do this in addition to the Wandering Encounter rules. Page 104 of the AD&D 1e Dungeon Master’s Guide provides guidance by contrasting different monster types and situations that I’ll paraphrase:
Skeletons and Zombies
The Party entered a crypt under an old temple and attacked skeletons and zombies encountered there. They respond only as the crypts are entered in turn. Being effectively mindless, they have no co-ordination in their attacks, and no pursuit will occur when the party breaks off.
A week later, the Party return. There there is no change in response. Those destroyed will not have been replaced (assuming, of course, that some necromancer is not nearby) by reinforcements. Doors and furniture previously damaged or destroyed will not have been repaired.
Giant Ants
The Party located and attacked a colony of giant ants. An ant colony is an organized hive mind; response is orderly. Warrior ants meet the attackers. Workers remove bodies, items dropped, and any rubble caused by the combat. If the queen is threatened, the workers join the defense. When the PCs retreat, there is a low chance that the Ants pursue.
A week later, the Party return. In the interim, pupae reaching maturity (perhaps 1d6 warriors and 3d4 workers) replace casualties incurred during the first encounter. The workers repaired destroyed tunnels and dug new tunnels. General activity of the colony carried on normally. Warriors will again meet the party (although they might be reduced in number). When the queen is killed, all organized activity will cease.
Orcs
The Party found a cave complex which is the lair of an orc band. The orcs usually have a warning device (a drum, horn, gong, bell, etc.) available for use by the guards. As soon as the attack occurs, one or two orcs will rush to inform the rest that they are under attack. Response to the attack will be in waves, with the nearest orcs coming first, and the leaders (most likely to be at the rear of the complex) coming up near the last.
Some traps might be set along the complex entry. Resistance will stiffen as the leaders (and ogres, if any) come up. When the Party retreats, there is a fair chance for pursuit by the boldest orcs.
A week later, the Party returns. The orcs are not likely to send for reinforcements, although returning group members replace losses. The orcs repair damage or destruction in the cave complex. More guards patrol the complex with increased discipline. Response to the attack is faster; leaders and spell casters are ready to fight.
Bandit Camp
The Party encountered a bandit camp and engaged in combat. The entire camp is organized and ready for action on the spur of the moment. As soon as the guards sound the alarm, reaction is swift. Defensive traps, snares, and pits make up a part of the defensive ring of the camp. Bandits move to take up assigned posts. Counterattacks are thrown against the Party. When the Party retreats, thieves and assassins of the bandit group will move to track and follow the Party to discover what its subsequent actions are and if another attack will ensue.
A week later, the Party returns. There is a great likelihood that the entire encampment will be gone if the Party was of sufficient power to cause serious trouble. Otherwise, the traps, pits, and snares will have been more carefully hidden and will be more numerous. Ambushes are set along the probable route of approach. A few more bandits might have been enlisted or called in from groups out raiding. All guards will have been doubled, all men more alert than ever, and all possible preparations made.
During the interim, an assassination attempt upon one or more of the members of the party might have been made (if the bandits have an assassin), an attempt to insinuate a spy into the party might have been made, and/or a raid upon the party’s camp may have been carried out by the bandits. If the party retreats, pursuit will take place if bandit strength still allows.
Restocking
Once the Party heads to the adventure, it slowly burns resources. They use their consumable magic items, they spend their Prepared Spells, and they accumulate System Strain. If the dungeon is large and threatening enough, they’ll have to retreat back to a settlement to get Comfortable Sleep and may want to return.
While they’re gone, restock the dungeon. Split the dungeon up into ~20-room sections. For every week the Party is away, roll 4d3-5 for each section. On positive results, that many encounters repopulate, either from new members being born (like Giant Ants), members returning from trips (like Bandits), or new monsters moving into the now-vacant space. To generate new occupants, use the Random Dungeon Encounters from Osric. Only re-stock up to the number of original keyed encounters and do not re-stock treasure.
Exploring Settlements
Many adventures will present a town with tons of keyed locations but totally fail to articulate how they envision such places to be explored. For instance, say that the Party goes to Gosterwick (the main town of Arden Vul). It would be absurd to say:
GM: You arrive at Gosterwick; it’s huge. You could go to Azure Keep, Lady Alexia’s Residence, Kaleo’s Bathhouse, The Baliff’s Truncheon, The Benevolent Brotherhood, The House of Gods, The Temple of Mitra, Temple of Heschius Ban, Temple of Demma, Temple of Lucreon, Residence of Chairduster the Metallurgist, The Stunned Acolyte Inn, The House of Sight, Torunn the Smith, The Private House, The Old Well Tavern, The Rarities Factor, The Grain Hall, The House of Coins, The Silent Factor, The Yellow Cloak Inn, The Central Market, House of the Thesmothete, The Prosperity Factor, Creon’s Curios and Pawnshop, The Muddy Puddle, Jeremias the Money Changer, Chairduster’s Fine Metallurgy, Astableon the Scribe and Bookseller, The Arcane Practitioners’ Club, Livestock and Horse Market, or The Kettles. What do you do?
In So You Want To Be A Game Master, Alexander recommends splitting up the settlement into 4-10 districts. For instance, Gosterwick has The Keep, Upper Market, Under Keep, Lower Market, Incense District, and The Outs. Then, whenever players want to do something in the city, ask them which district they want to do stuff in, reminding them of the general vibe.
If they just want to explore, ask which district they want to explore in. Pick a (random) keyed location from the district for them to check out.
If they’re looking for something specific (like an inn, library, or clue), ask which district they search. If that district doesn’t have the thing they’re looking for, have someone from that district recommend options in other districts.
GM: You finally make it back from the Halls of Arden Vul to the “safety” of Gosterwick. What do you do?
Alice: Let’s find an inn; we’re ready to crash.
GM: Which district? There’s Upper Market which is a little snobby, Under Keep is poor and seedy, Lower market is prosperous, Incense District enmeshes nobility with the masses, and The Outs is barely more than a shanty.
Alice: Let’s check Lower Market.
GM: Crossing the Imperial Gate and walking the Imperial Way, you pass The House of the Thesmothete, a 3-story stone-and-wood structure that serves as the civic heart of Gosterwick. Across from the Thesmothete is the Yellow Cloak Inn, painted imperial yellow and is 5 stories tall…